
Lemon Ricotta Gnocchi
with Brown Butter Sage
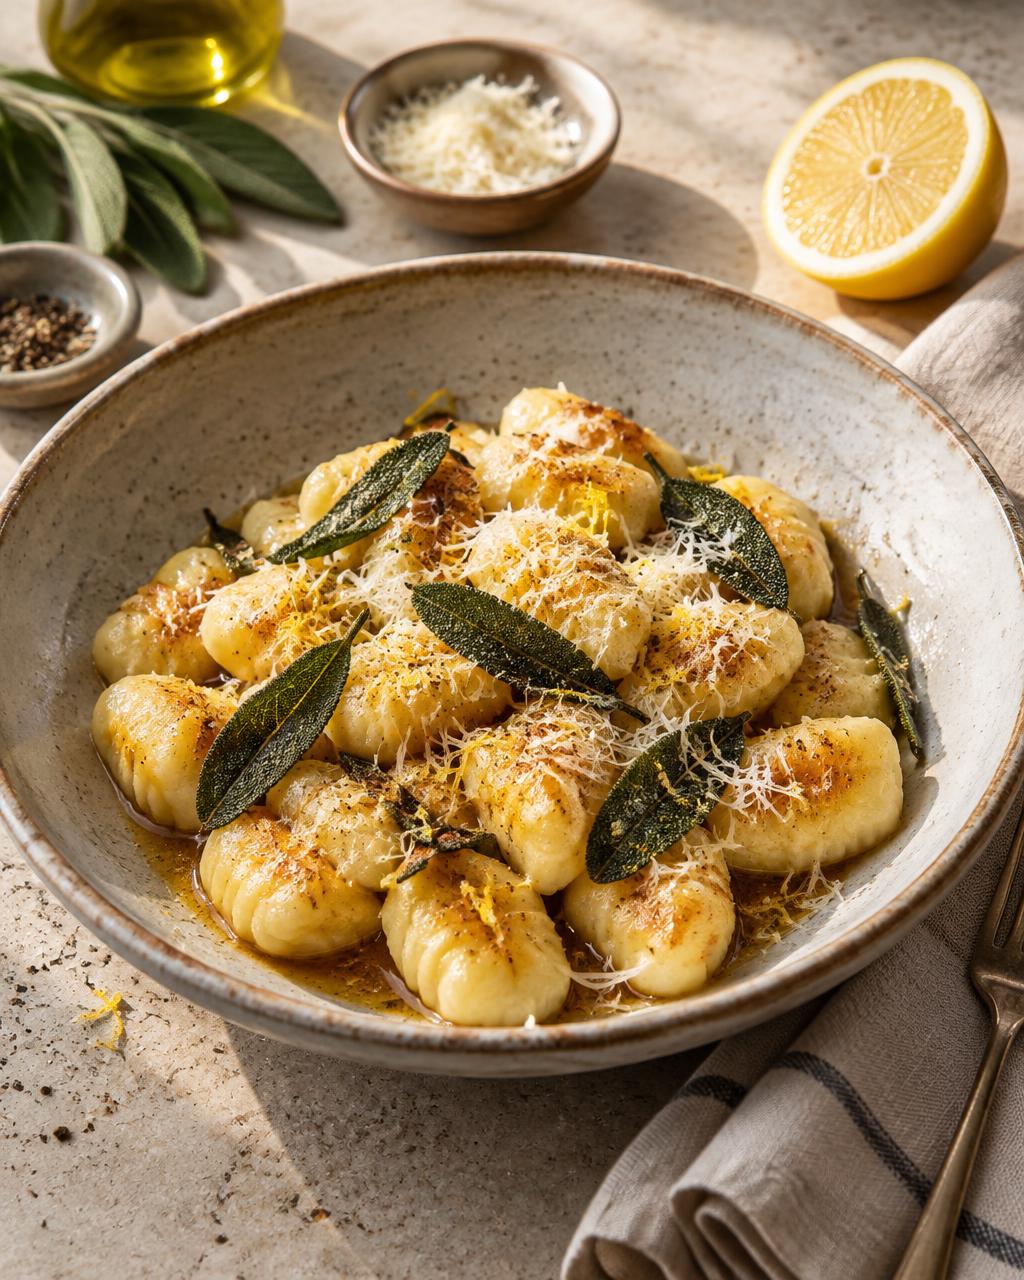
Soft ricotta gnocchi, crisp at the edges, with nutty brown butter, fried sage, lemon and Parmesan.
Some recipes earn their place because they're practical. Others stay because of the way they make an ordinary evening feel.
This is a little of both.
The gnocchi are soft and tender, with edges that catch in the pan just enough to turn golden. Brown butter makes the whole thing taste far more complicated than it is, while lemon and sage keep it bright and fragrant.
It feels like something you might order somewhere special.
- Prep
- 25 minutes
- Cook
- 15 minutes
- Total
- 40 minutes
- Serves
- 4
What You'll Need
For the Gnocchi
- 15 ounces whole-milk ricotta
- 1 large egg
- 1/2 cup finely grated Parmesan
- Finely grated zest of 1 lemon
- 1/2 teaspoon kosher salt
- 3/4 cup all-purpose flour, plus more for the work surface
For the Brown Butter Sage
- 6 tablespoons unsalted butter
- 12–15 fresh sage leaves
- 1 small garlic clove, lightly smashed
- 1 teaspoon fresh lemon juice, plus more only if needed
- Freshly ground black pepper
- Finely grated Parmesan, for serving
- Flaky salt, optional
The Simple Method
Dry the Ricotta
Spread the ricotta over several layers of paper towel or a clean smooth kitchen towel. Cover with additional paper towel and press gently. Let it sit for about 10 minutes, then scrape the ricotta into a bowl.
Make the Dough
Add the egg, Parmesan, lemon zest and salt to the ricotta and gently mix. Fold in 1/2 cup flour. Add the remaining flour a tablespoon or two at a time only until a soft, slightly tacky dough forms.
Don't knead it.
Test One
Bring a wide pot of salted water to a gentle boil. Pinch off a small piece of dough and drop it in. If it holds together as it cooks, stop adding flour. If it begins to dissolve or fall apart, gently fold another tablespoon of flour into the dough and test again.
Shape
Turn the dough onto a lightly floured surface and divide into four pieces. Gently roll each into a rope about 3/4 inch thick and cut into approximately 1-inch pieces.
No fork ridges required. This is supposed to be achievable on a Tuesday.
Give Them a Short Chill
Transfer the gnocchi to a parchment-lined tray dusted lightly with flour and refrigerate for about 15 minutes while you bring the water back to a boil.
Cook
Working in batches, lower the gnocchi into gently boiling salted water. When they rise to the surface, allow them another 30–60 seconds before removing them with a slotted spoon.
Transfer to a plate rather than piling them deeply in a bowl.
Make the Brown Butter Sage
Melt the butter in a large, light-colored skillet over medium heat. Add the smashed garlic and sage.
Continue cooking until the sage becomes crisp and the butter smells nutty and develops golden-brown flecks. Remove the garlic.
Crisp the Gnocchi
Add the cooked gnocchi to the brown butter and let them sit briefly against the skillet before gently turning.
We aren't frying them hard; we're looking for scattered golden edges while keeping the centers soft.
Finish
Take the skillet off the heat. Add 1 teaspoon lemon juice, several turns of black pepper and a shower of Parmesan. Toss gently.
Taste.
If it needs brightness, squeeze in a little more lemon.
Serve immediately with the crisp sage leaves, more Parmesan and a little flaky salt if needed.
A Few Things That Make This Easier
The Ricotta Matters More Than the Flour
If your dough feels extremely wet, don't immediately dump more flour into it. The ricotta probably retained too much moisture.
Make One Sacrificial Gnocchi
That first tester tells you more about your dough than a precise flour measurement ever could.
They Don't Need to Look Perfect
Slightly irregular gnocchi actually suit this dish. We're after tender, not manufactured.
Make Them Ahead
Shape the gnocchi and refrigerate them on their tray for later that day. They can also be frozen on the tray and transferred to a freezer-safe container once firm.
For More Texture
Let the gnocchi sit against the skillet for a few seconds before turning so some sides become golden.
For a Dinner-Party Variation
Scatter crisp prosciutto or pancetta over the finished bowls.
It's the moment the sage hits the butter.
The leaves curl at the edges, the butter turns golden and suddenly the kitchen smells like you've been cooking all afternoon.
You haven't.
That may be my favorite kind of recipe.
Don't save this one for company.
Put it into shallow bowls on an ordinary night, tear some bread for the table and call everyone in while the butter is still warm.
Not every beautiful meal needs an occasion.
More from the Kitchen
Hidden & Seen HS
Lemon Ricotta Gnocchi with Brown Butter Sage
Soft ricotta gnocchi, crisp at the edges, with nutty brown butter, fried sage, lemon and Parmesan.
- Prep
- 25 minutes
- Cook
- 15 minutes
- Total
- 40 minutes
- Serves
- 4
What You'll Need
For the Gnocchi
- 15 ounces whole-milk ricotta
- 1 large egg
- 1/2 cup finely grated Parmesan
- Finely grated zest of 1 lemon
- 1/2 teaspoon kosher salt
- 3/4 cup all-purpose flour, plus more for the work surface
For the Brown Butter Sage
- 6 tablespoons unsalted butter
- 12–15 fresh sage leaves
- 1 small garlic clove, lightly smashed
- 1 teaspoon fresh lemon juice, plus more only if needed
- Freshly ground black pepper
- Finely grated Parmesan, for serving
- Flaky salt, optional
The Simple Method
Dry the Ricotta
Spread the ricotta over several layers of paper towel or a clean smooth kitchen towel. Cover with additional paper towel and press gently. Let it sit for about 10 minutes, then scrape the ricotta into a bowl.
Make the Dough
Add the egg, Parmesan, lemon zest and salt to the ricotta and gently mix. Fold in 1/2 cup flour. Add the remaining flour a tablespoon or two at a time only until a soft, slightly tacky dough forms.
Don't knead it.
Test One
Bring a wide pot of salted water to a gentle boil. Pinch off a small piece of dough and drop it in. If it holds together as it cooks, stop adding flour. If it begins to dissolve or fall apart, gently fold another tablespoon of flour into the dough and test again.
Shape
Turn the dough onto a lightly floured surface and divide into four pieces. Gently roll each into a rope about 3/4 inch thick and cut into approximately 1-inch pieces.
No fork ridges required. This is supposed to be achievable on a Tuesday.
Give Them a Short Chill
Transfer the gnocchi to a parchment-lined tray dusted lightly with flour and refrigerate for about 15 minutes while you bring the water back to a boil.
Cook
Working in batches, lower the gnocchi into gently boiling salted water. When they rise to the surface, allow them another 30–60 seconds before removing them with a slotted spoon.
Transfer to a plate rather than piling them deeply in a bowl.
Make the Brown Butter Sage
Melt the butter in a large, light-colored skillet over medium heat. Add the smashed garlic and sage.
Continue cooking until the sage becomes crisp and the butter smells nutty and develops golden-brown flecks. Remove the garlic.
Crisp the Gnocchi
Add the cooked gnocchi to the brown butter and let them sit briefly against the skillet before gently turning.
We aren't frying them hard; we're looking for scattered golden edges while keeping the centers soft.
Finish
Take the skillet off the heat. Add 1 teaspoon lemon juice, several turns of black pepper and a shower of Parmesan. Toss gently.
Taste.
If it needs brightness, squeeze in a little more lemon.
Serve immediately with the crisp sage leaves, more Parmesan and a little flaky salt if needed.
A Few Things That Make This Easier
The Ricotta Matters More Than the Flour
If your dough feels extremely wet, don't immediately dump more flour into it. The ricotta probably retained too much moisture.
Make One Sacrificial Gnocchi
That first tester tells you more about your dough than a precise flour measurement ever could.
They Don't Need to Look Perfect
Slightly irregular gnocchi actually suit this dish. We're after tender, not manufactured.
Make Them Ahead
Shape the gnocchi and refrigerate them on their tray for later that day. They can also be frozen on the tray and transferred to a freezer-safe container once firm.
For More Texture
Let the gnocchi sit against the skillet for a few seconds before turning so some sides become golden.
For a Dinner-Party Variation
Scatter crisp prosciutto or pancetta over the finished bowls.